Discover 15 iPhone Secrets That Will Leave You Wishing You Knew Sooner!
Productivity Hacks
1. View Wi-Fi Password
Step 1: Go to Settings, then tap Wi-Fi.
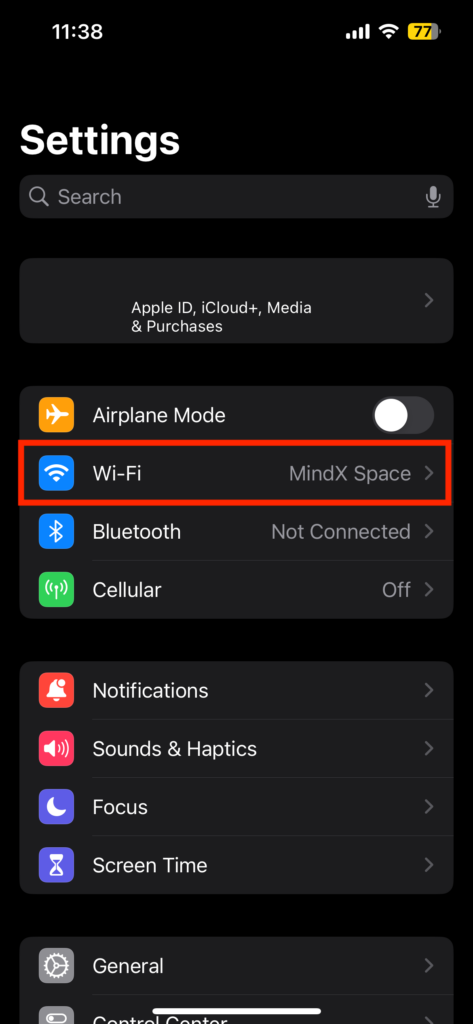
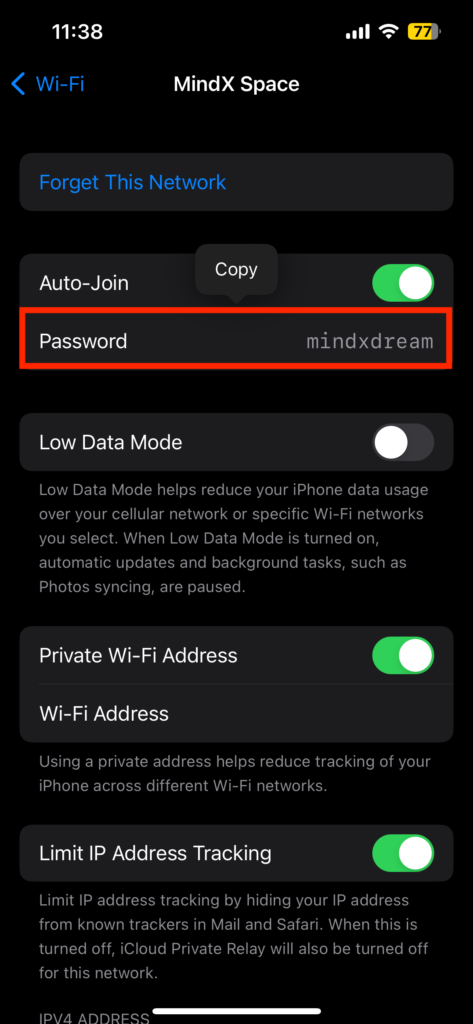
Step 2: Tap the information button, which looks like the letter “i”, next to the Wi-Fi network you’re connected to.
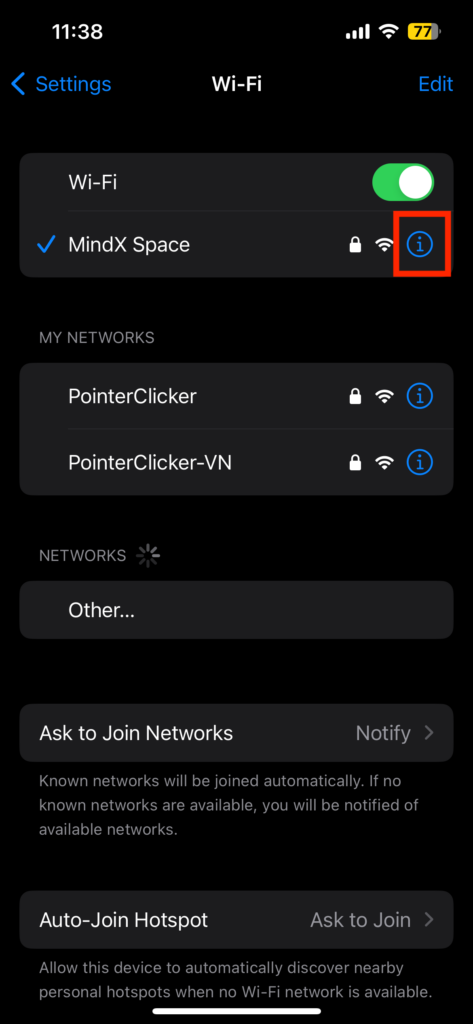
Step 3: Tap the Password and use Face ID or Touch ID to unlock and reveal it.
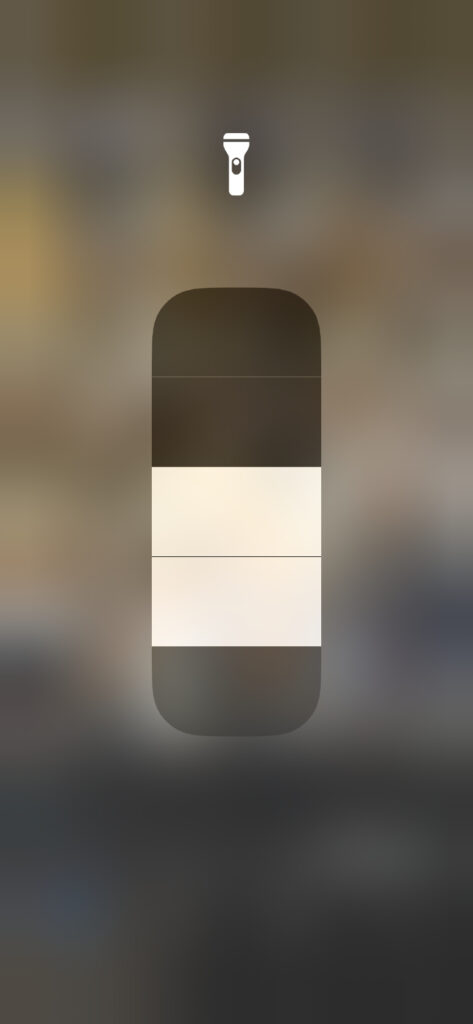
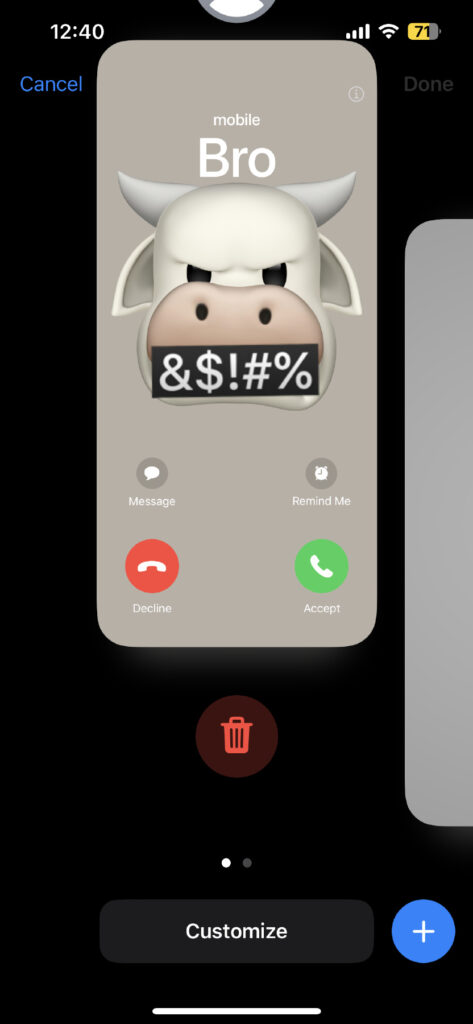
2. Quick Access to Handy Features
Want to make your iPhone do things faster?
Haptic Touch in the Control Center offers quick actions and settings adjustments for your iPhone’s features.
Step 1: Swipe down from the top-right corner of your screen to find the Control Center.
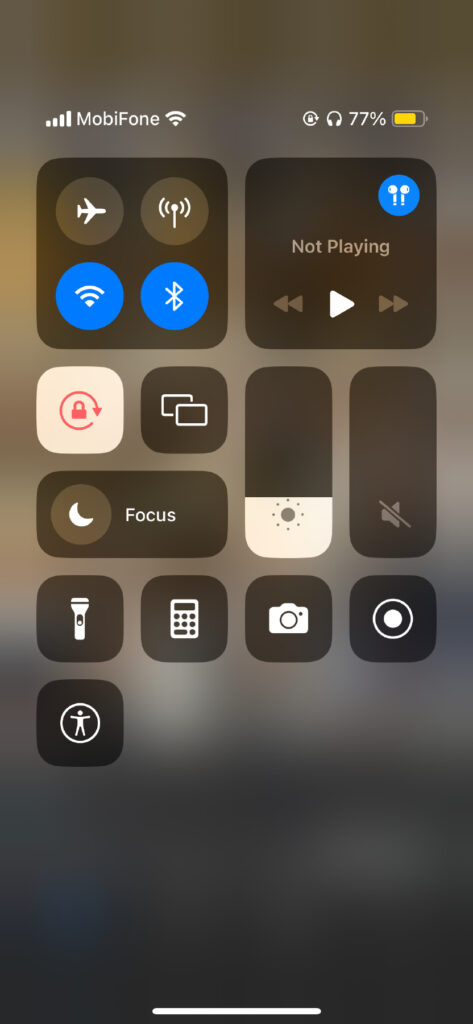
Step 2: Press and hold down on any icons to access the shortcuts.
For instance:
- Flashlight icon: Press and hold the flashlight to make it brighter or dimmer.
- Wi-Fi icon: Press and hold the Wi-Fi icon to quickly see all available networks and hop onto a different one without wandering through the Settings app.
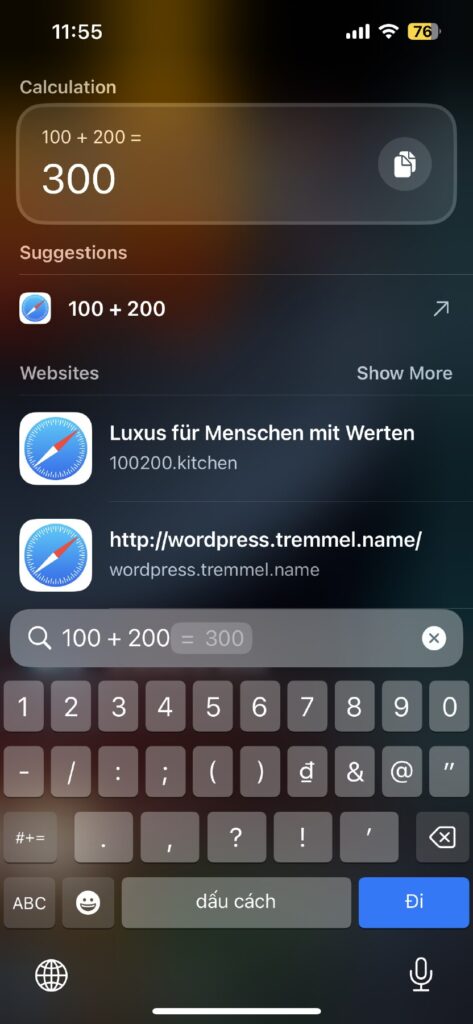
3. Quick Calculator Tip
Ever need a quick math answer but don’t want to dig around for your Calculator app? Here’s a fast trick:
Step 1: Swipe down from the middle of your home screen to open up the Spotlight Search.
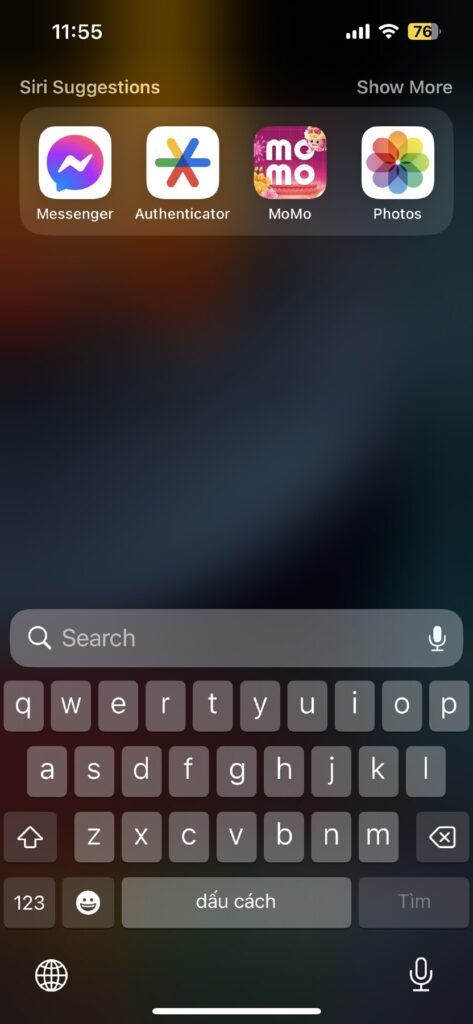
Step 2: Start typing your math equation or numbers right into the search bar that appears at the top.
For example, you can type “100 + 200” or “50 * 4”.
As soon as you type it in, look at the top of the search results for your calculation’s answer.
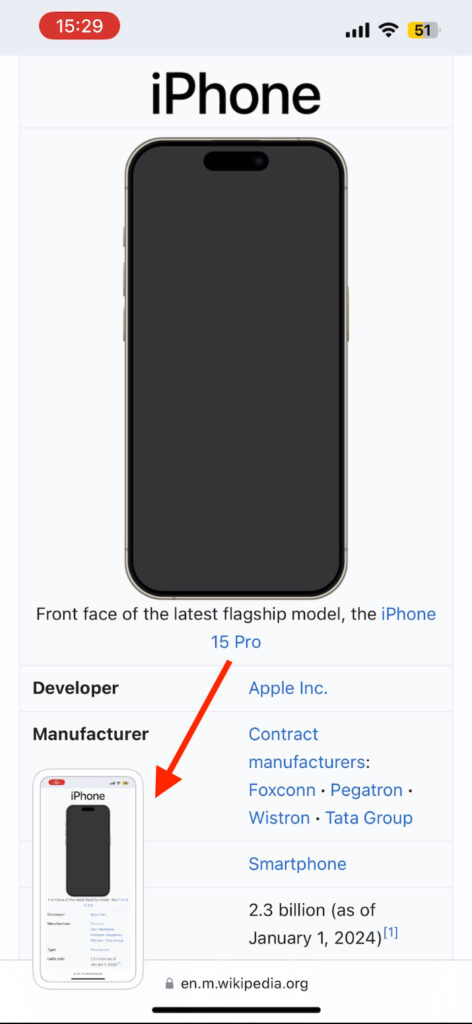
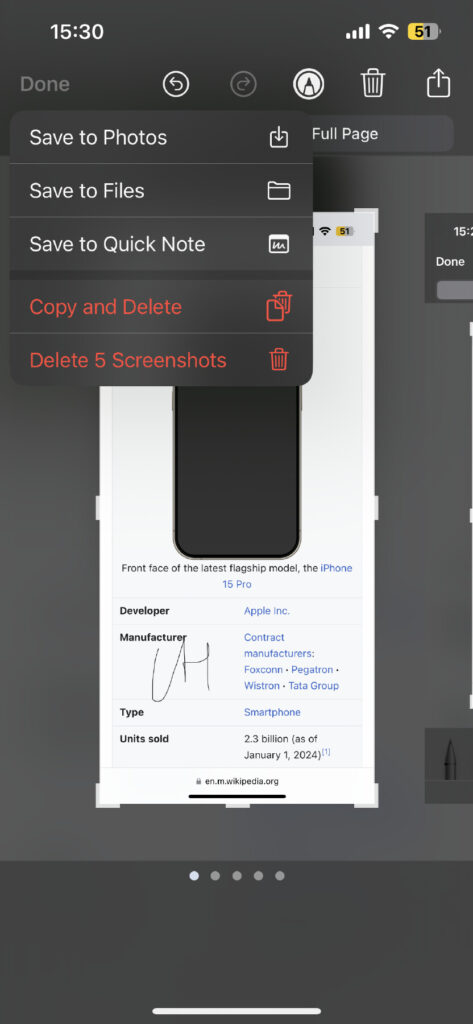
4. Screenshot an Entire Page
This tip is super handy for capturing more than just what’s on your screen, especially for web pages or documents.
Step 1: Take a screenshot by pressing and quickly releasing both the side button (on the right) and the volume up button (on the left) at the same time.
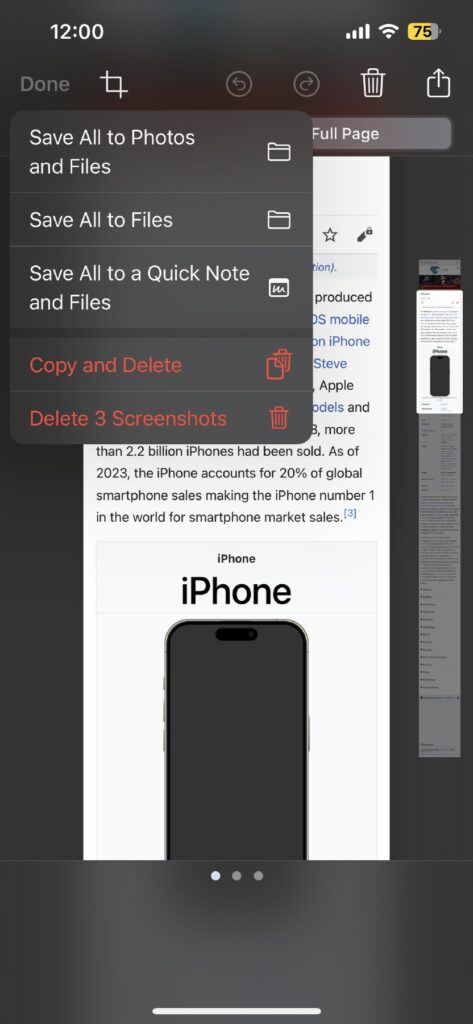
Step 2: Tap on the small preview of your screenshot in the bottom-left corner of your screen to open it.
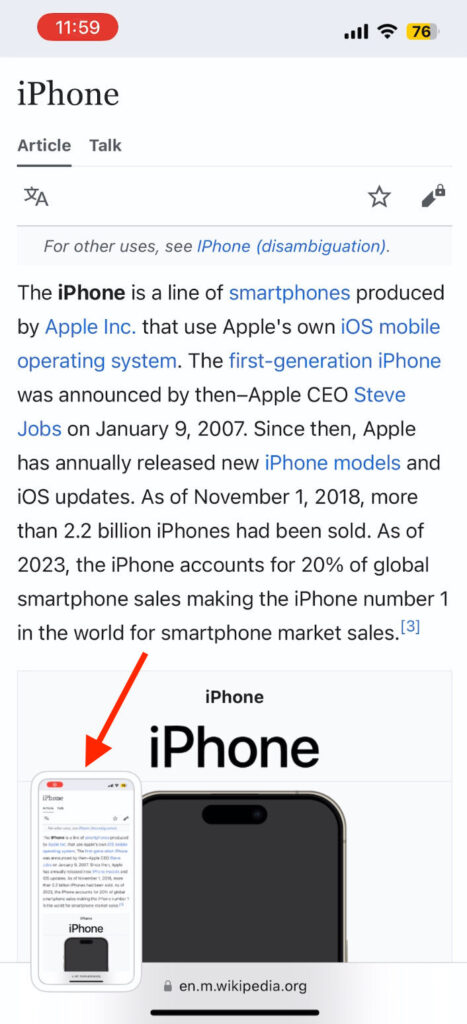
Step 3: At the top of the screen, you’ll see two tabs: Screen and Full Page. Tap on Full Page.

Step 4: Tap Done in the top-left corner, then select where you want to save it on your device or in your iCloud Drive.
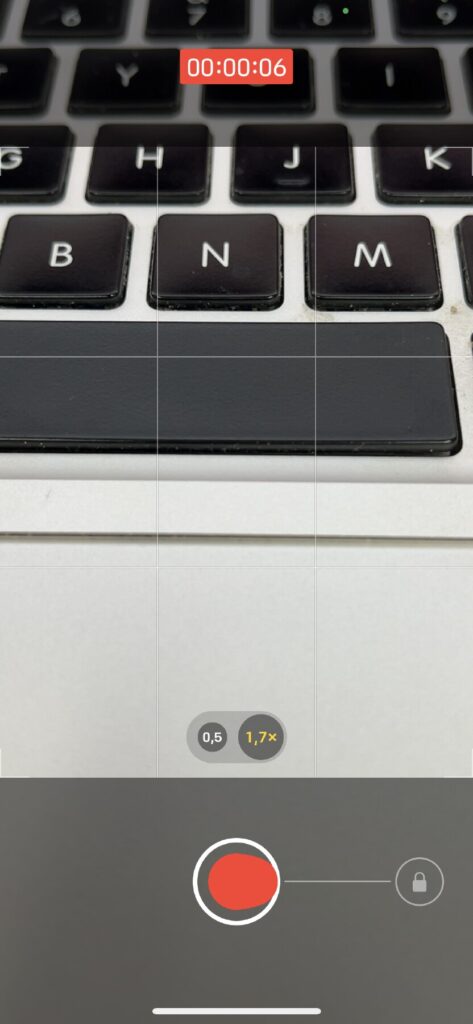
5. Video Recording Shortcuts
Start Recording Instantly
Step 1: Open your Camera app as if you’re going to take a picture.
Step 2: Instead of tapping the shutter button once (like for photos), press and hold the camera button to start recording without switching modes.
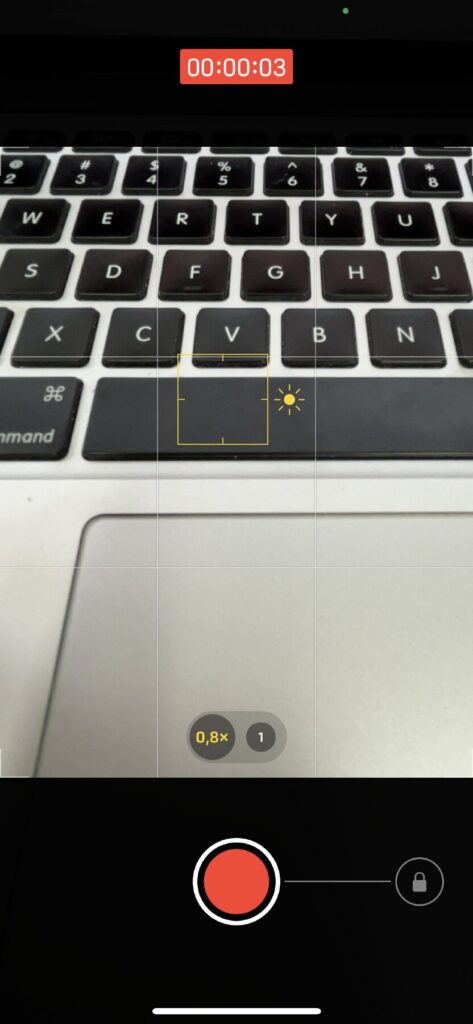
Master the Zoom While Recording
While you’re holding down the camera button to record, slide your finger up or down on the screen.
This will smoothly zoom in and out of your video scene to add some dramatic effects to your videos!
Personalization Hacks
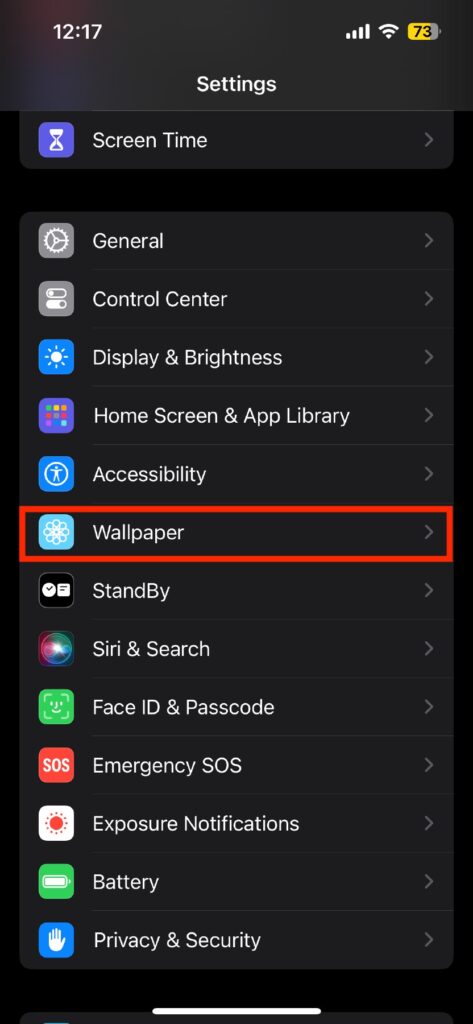
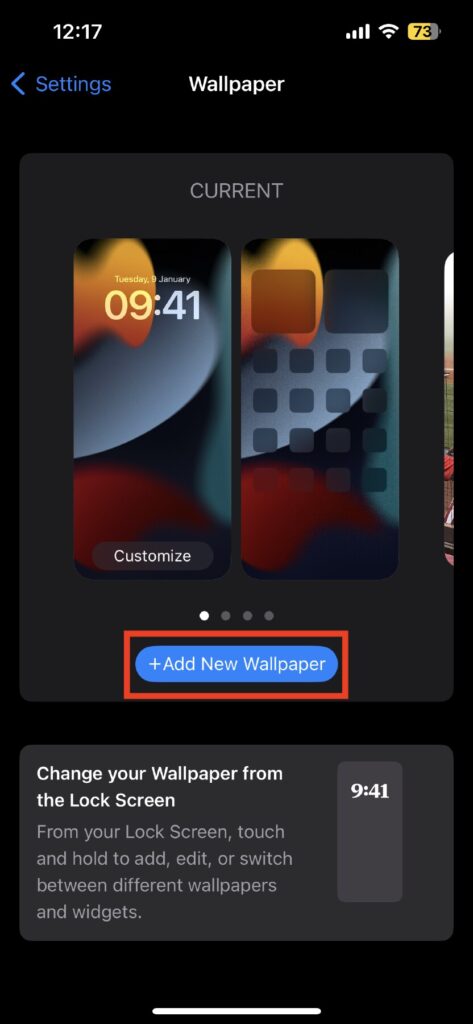
6. Add a New Wallpaper
Step 1: Go to Settings, scroll down and tap Wallpaper.
Step 2: Tap Add New Wallpaper.
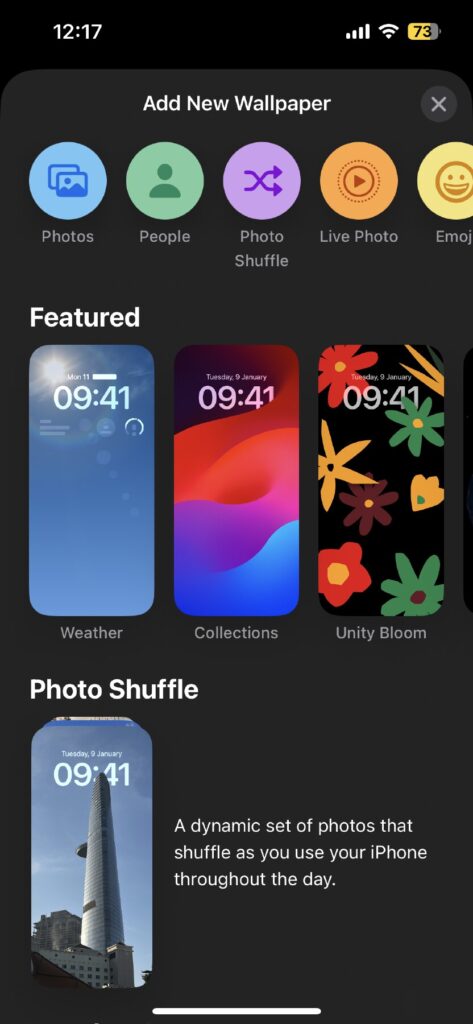
Step 3: Now, you have some choices:
- Photos: Pick a personal photo from your camera roll.
- People: Choose a photo that focuses on faces.
- Photo Shuffle: Let your iPhone shuffle through selected photos periodically.
- Live Photo: Pick a Live Photo that moves when you touch it.
Or, select a themed wallpaper from categories like Weather & Astronomy, Kaleidoscope, Emoji, Unity, Pride, Collections, or Color.
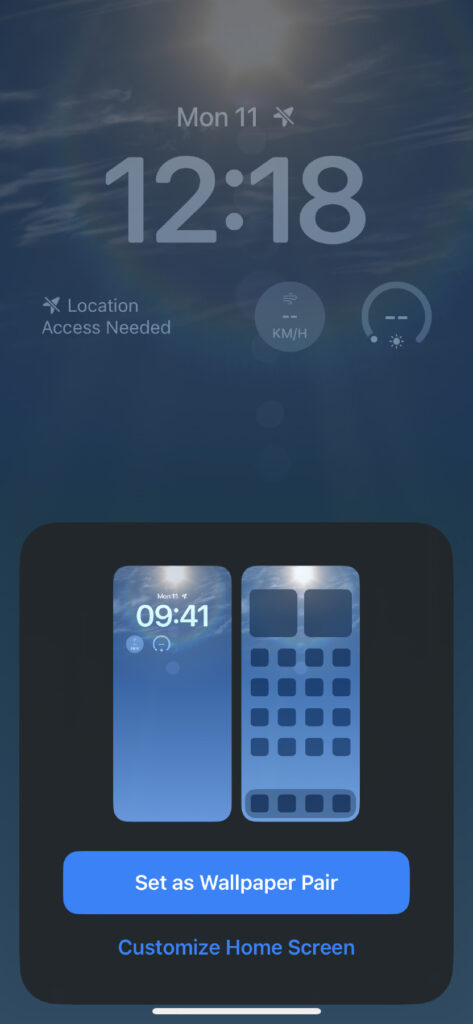
Step 4: Once you’ve selected a wallpaper, you can add filters, widgets, or styles to make it truly yours, then tap Add.

Step 5: Tap Set as Wallpaper Pair if you want your new wallpaper to appear on both your Home Screen and Lock Screen.
If not, you can tap Customize Home Screen to edit and set a separate wallpaper specifically for the Home Screen.
7. Change Your Wallpaper from the Lock Screen
Step 1: Before you start, make sure Face ID is set up and ready to go for this feature to work.
Step 2: Wake up your phone by tapping the screen or pressing the side button. Don’t unlock it; just light up the Lock Screen.
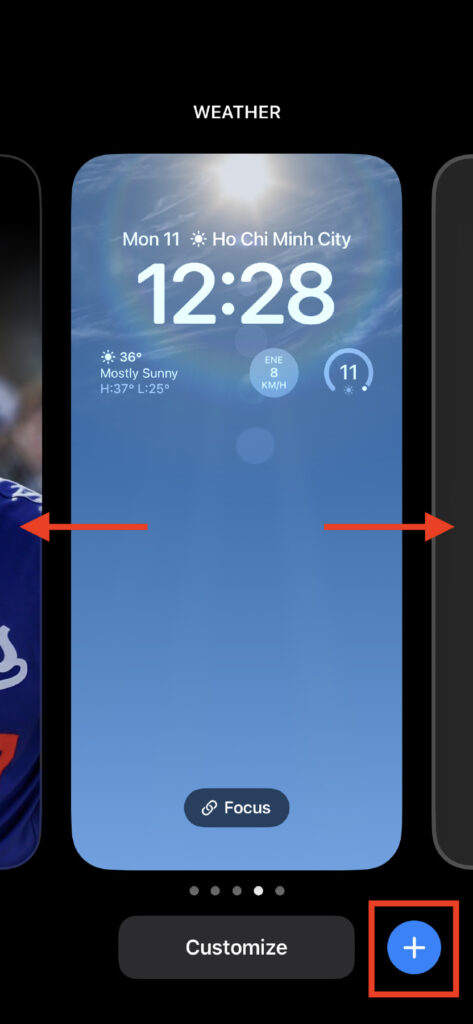
Step 3: Press and hold anywhere on your Lock Screen that’s not a notification. Keep holding until the wallpaper gallery shows up.
Step 4: If you’re looking to switch to a wallpaper you’ve used before, swipe left or right to find it. Or tap the + button to create a new wallpaper.
Note: If your iPhone doesn’t recognize you with Face ID, or if the Customize button doesn’t pop up right away, just press and hold the Lock Screen again.
If needed, your iPhone will ask for your passcode.
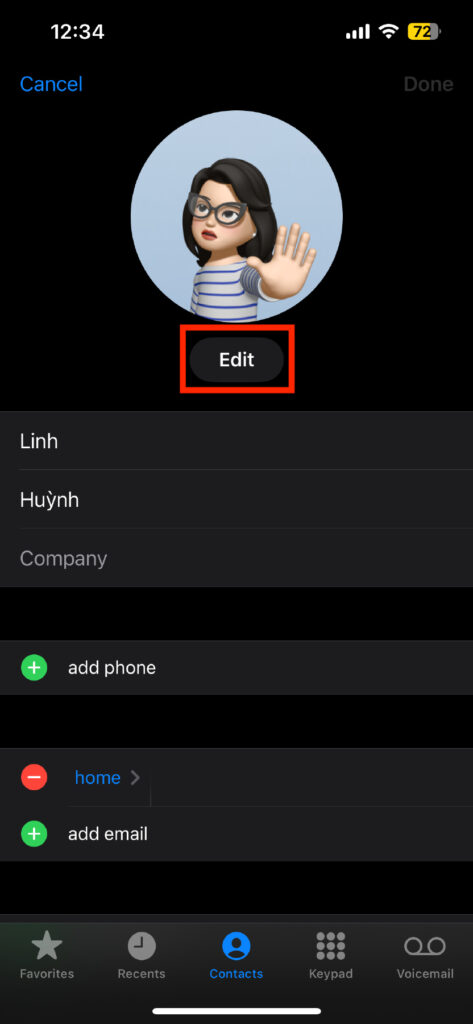
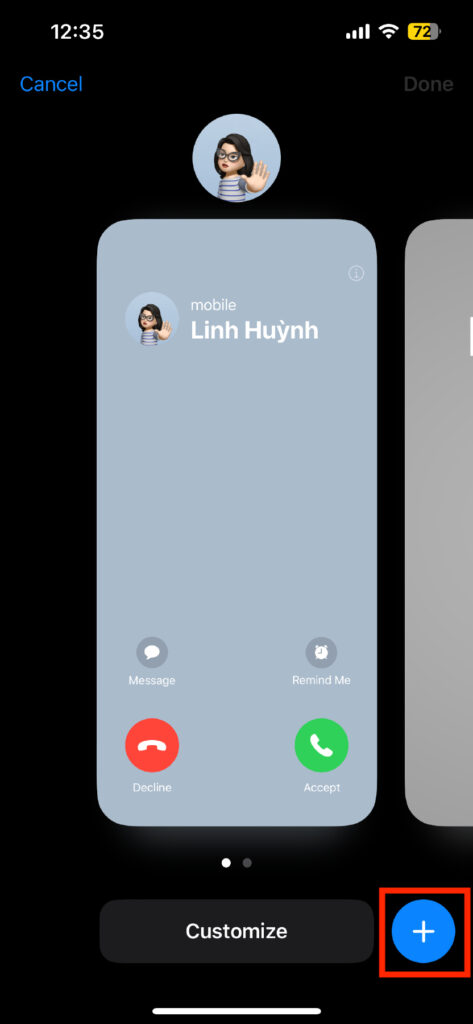
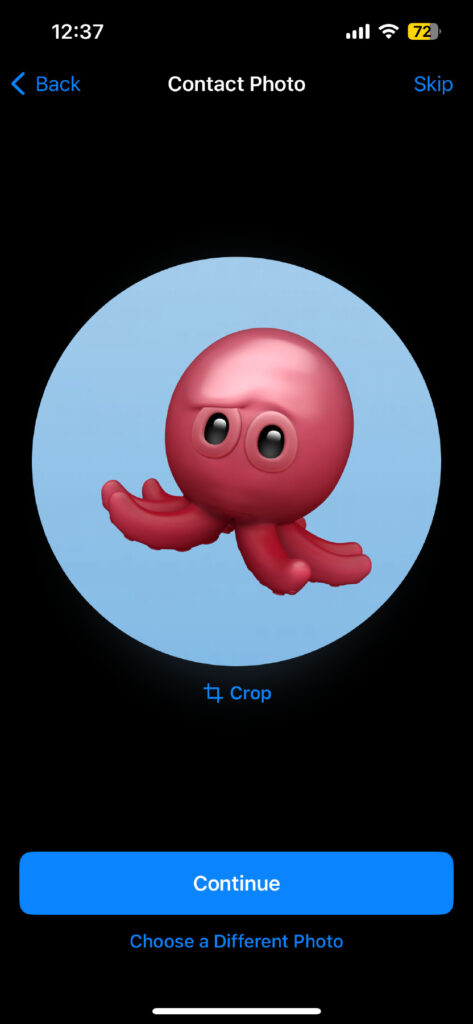
8. Create Contact Poster
For You
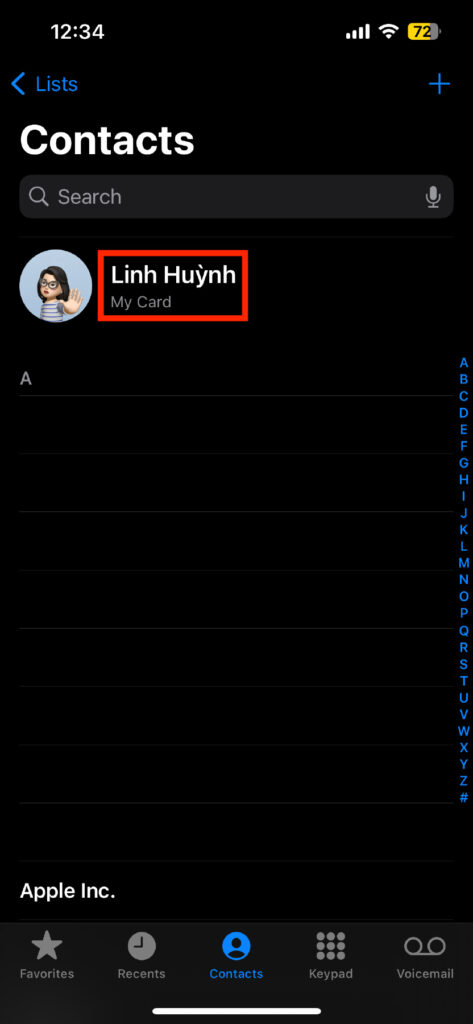
Step 1: Open the Contacts app and tap on My Card at the top.
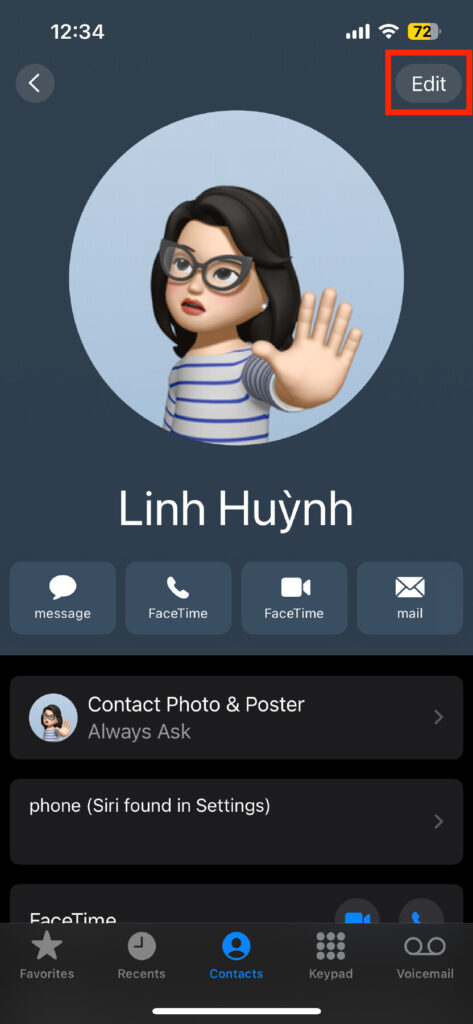
Step 2: Hit Edit in the top right corner, then hit Edit under your profile photo.
Step 3: Tap the + button in the bottom right to make a new poster.
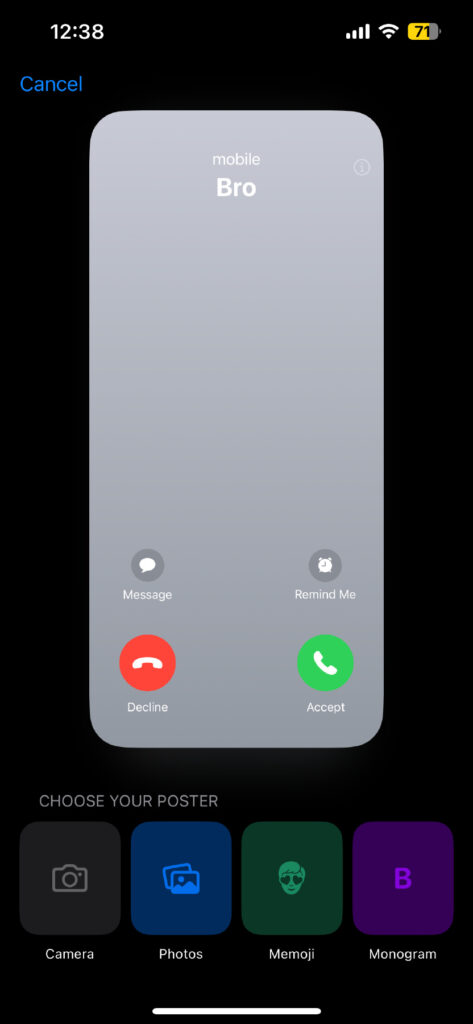
Step 4: Choose your poster style. Play around with the background, fonts, and colors until it’s just right.
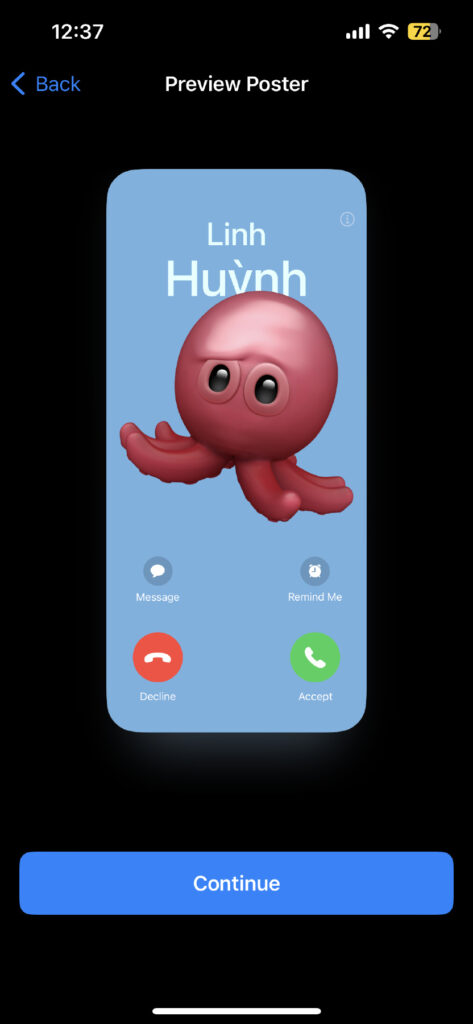
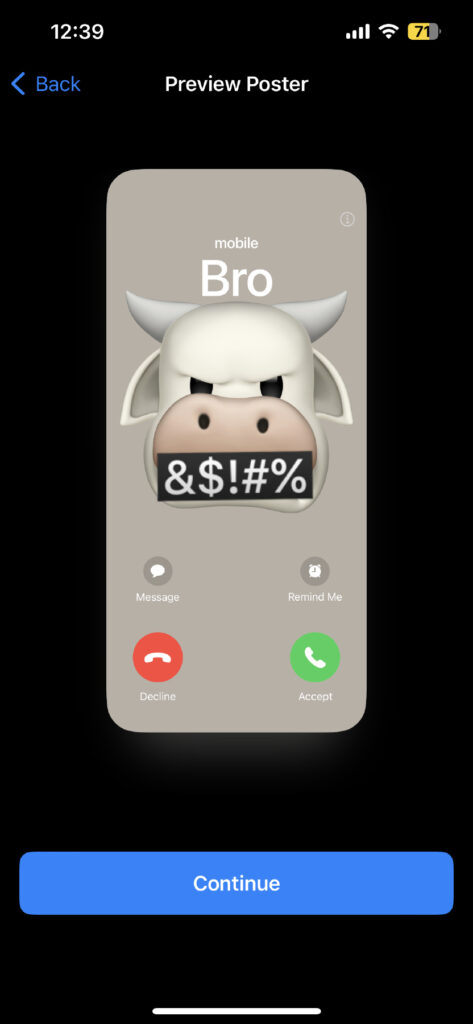
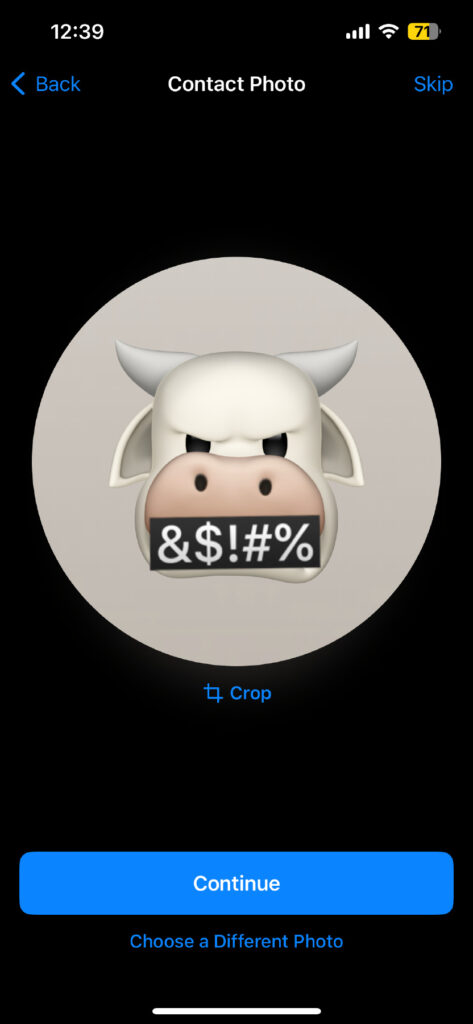
Step 5: Tap Continue to confirm, and you’ll be asked to update your contact photo. Select Continue to use the same image as the Contact Poster, Choose a Different Photo to pick a different one, or Skip if you don’t want to change the photo.
For Others
Step 1: Choose the contact you want to edit, then tap Contact Photo & Poster.
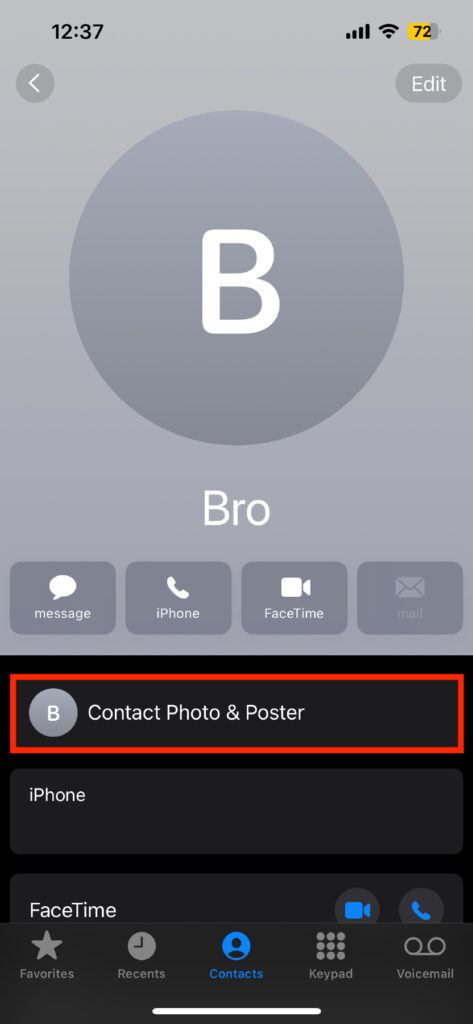
Step 2: Pick a poster style and adjust the background, font, and colors to match your (or their) taste.
Step 3: Tap Continue to confirm, and you’ll be asked to update your contact photo. Select Continue to use the same image as the Contact Poster, Choose a Different Photo to pick a different one, or Skip if you don’t want to change the photo.
If you want to delete a contact poster, go to Contact Photo & Poster, tap Edit, swipe up on the poster you want to delete, and hit the delete button.
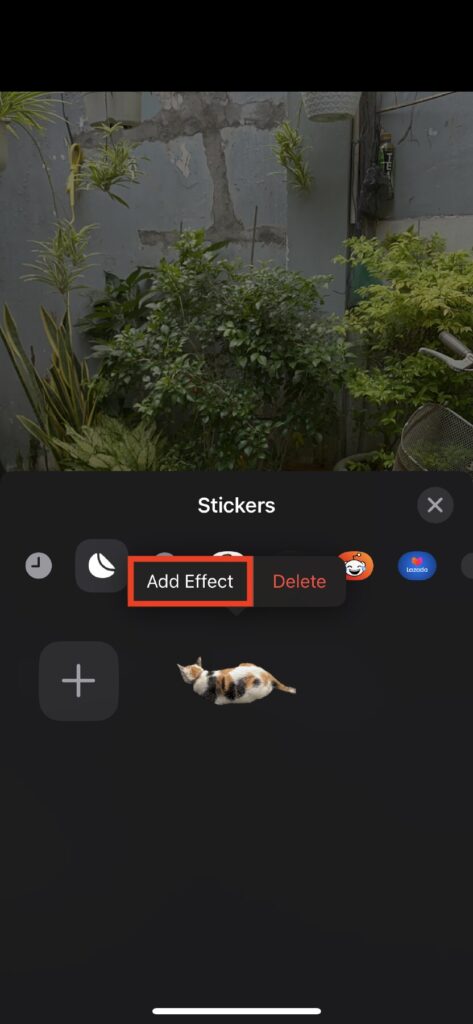
9. Make Your Own Stickers
Step 1: Open the Photos app to browse your gallery.
Step 2: Tap on any photo to view it in full screen. Choose one where the subject you want to turn into a sticker is clear.
Step 3: Press and hold on the part of the photo you want to make into a sticker (like a person, pet, or object).

Step 4: A small menu will pop up, tap Add Sticker.

Step 5: After adding, you’ll see options to jazz up your sticker. Tap Add Effect to explore fun effects like Outline, Comic, or Puffy.
Once you’re happy with your sticker, tap the close button to finish and save it to your sticker collection.
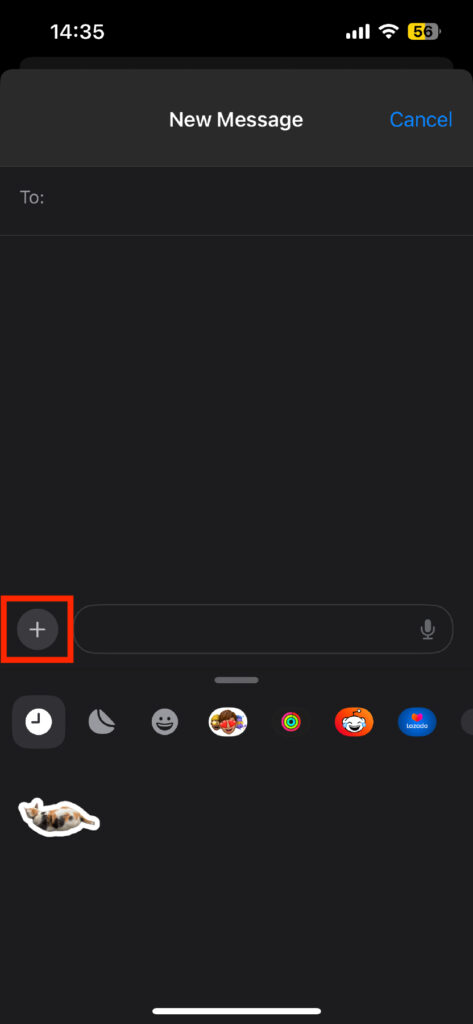
Where to Find Your Stickers:
Find your newly created stickers in your sticker menu anytime you’re typing with the iPhone keyboard or using the Markup tools in photos.
If you want to narrate what you’re doing on your iPhone screen, here’s how to do it, step by step:
Add Screen Recording Button to the Control Center
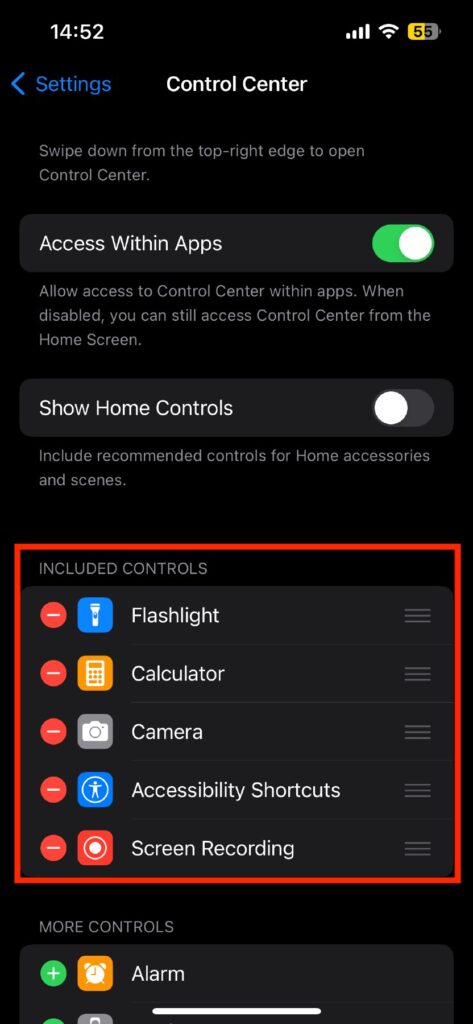
Step 1: Go to Settings, scroll down and tap on Control Center.
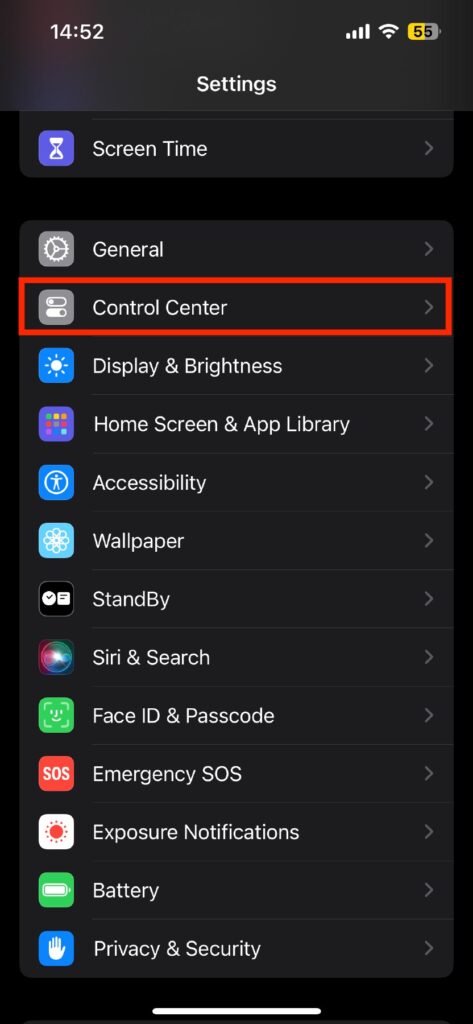
Step 2: Scroll down to More Controls and find Screen Recording. Tap the green plus icon next to it.
This action moves the Screen Recording button to the Included Controls list, meaning it will now show up in your Control Center.
Record Your Screen With Your Voice
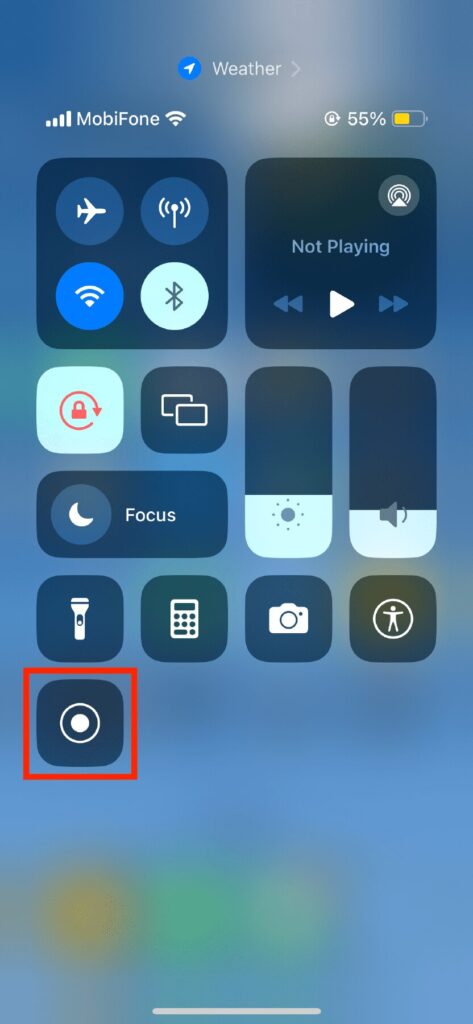
Step 1: Swipe down from the top-right corner of your screen to open the Control Center.
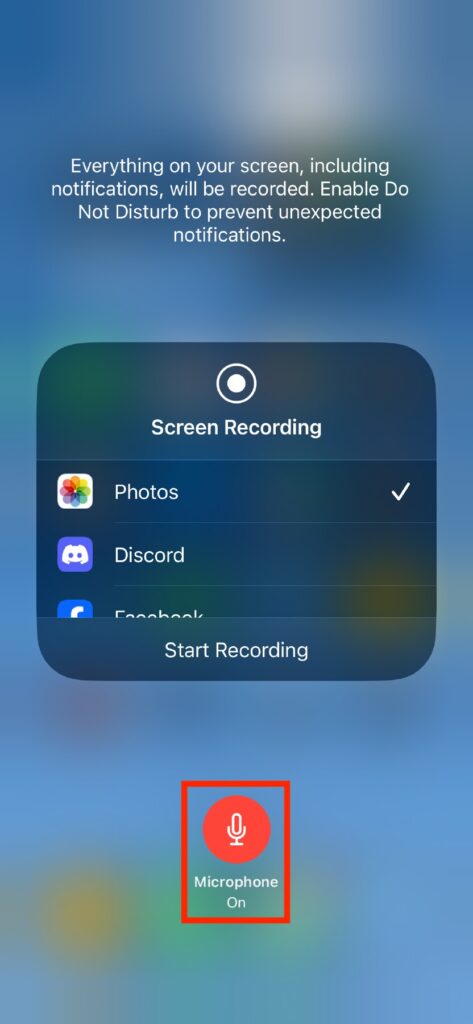
Step 2: Find the Screen Recording button (it looks like a solid circle inside another circle) and press and hold it to bring up the Screen Recording options.
Step 3: Tap the Microphone button at the bottom of the screen to capture your voice along with the screen recording.
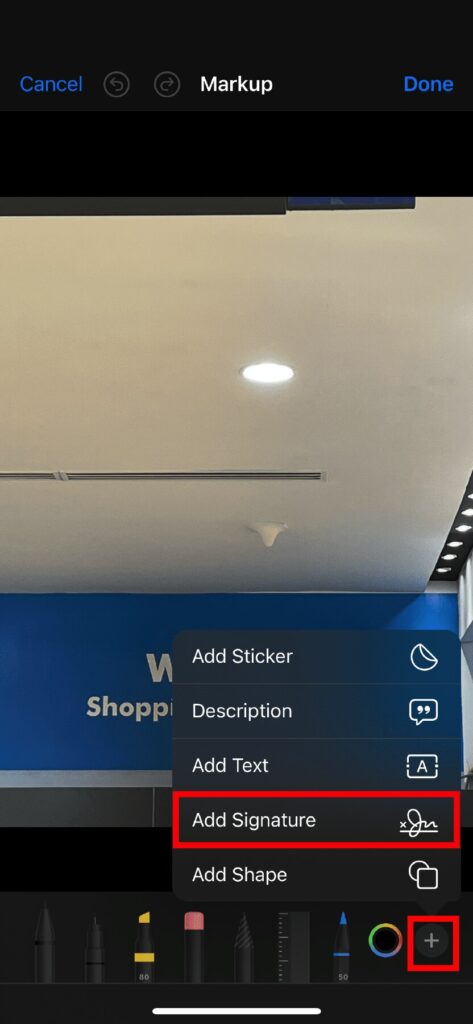
11. Add Signature
On Your Photo
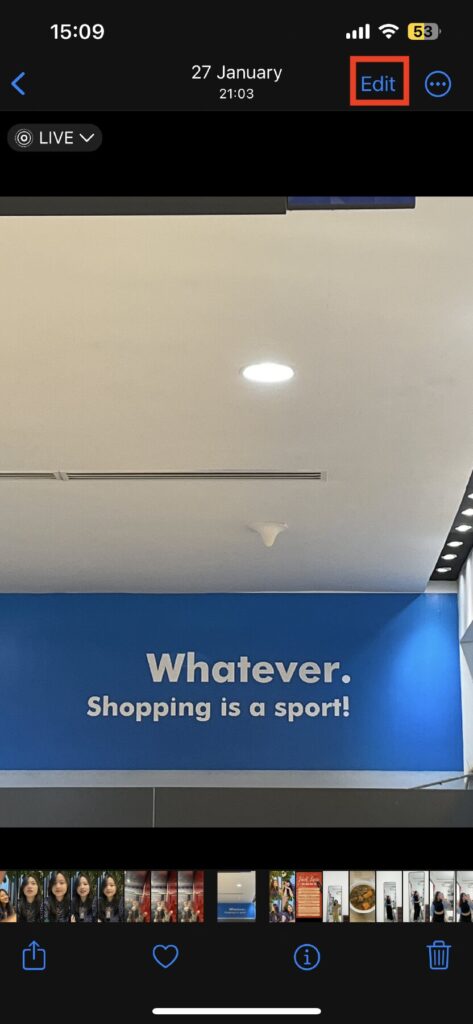
Step 1: Open the Photos app and select the photo you’d like to sign.
Step 2: Tap Edit in the top right corner.
Step 3: Tap the Markup icon (it looks like a pen tip) in the top right corner.
Step 4: Tap the + button in the bottom right of the screen, then select Add Signature.
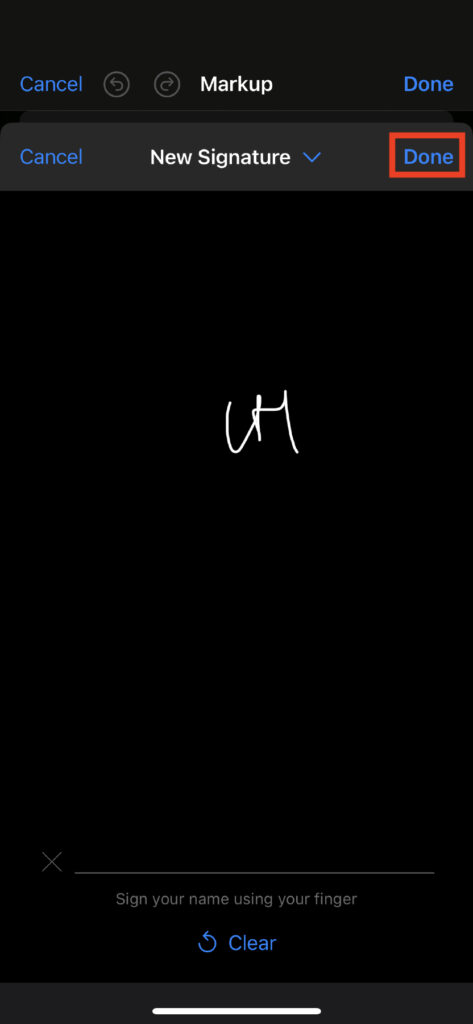
Step 5: Use your finger to sign directly on the screen, then tap Done.
Step 6: Move or resize your signature by dragging it or using the blue dots around it. Change the color or thickness if you want, using the options provided.
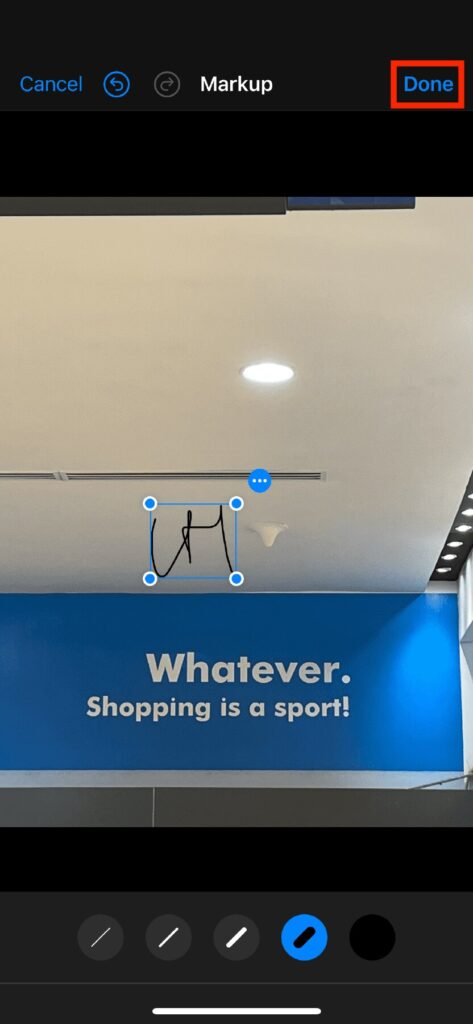
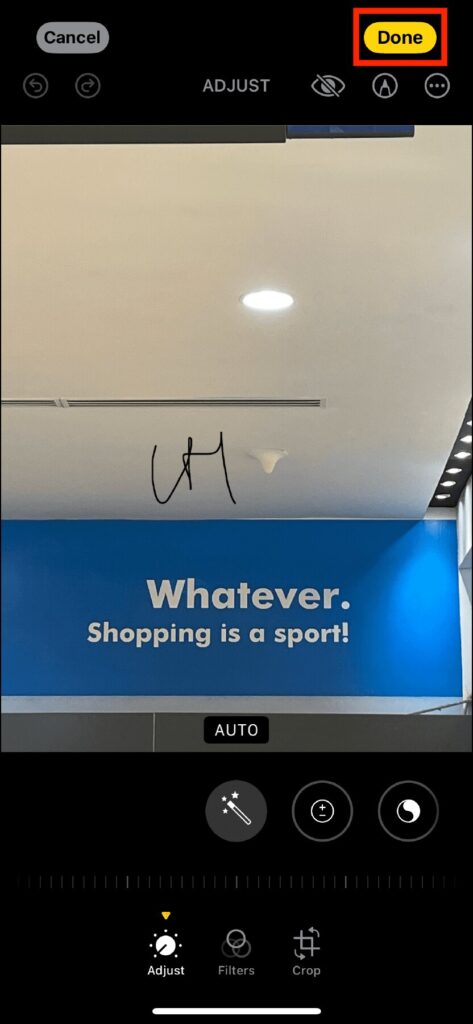
Step 7: Tap Done twice to save your signed photo.
On Your Screenshot
Step 1: Take a screenshot by pressing and quickly releasing both the side button (on the right) and the volume up button (on the left) at the same time.
Step 2: Tap the screenshot preview in the bottom left corner, then hit the Markup icon.
Step 3: Tap the + button, select Add Signature, and sign with your finger.
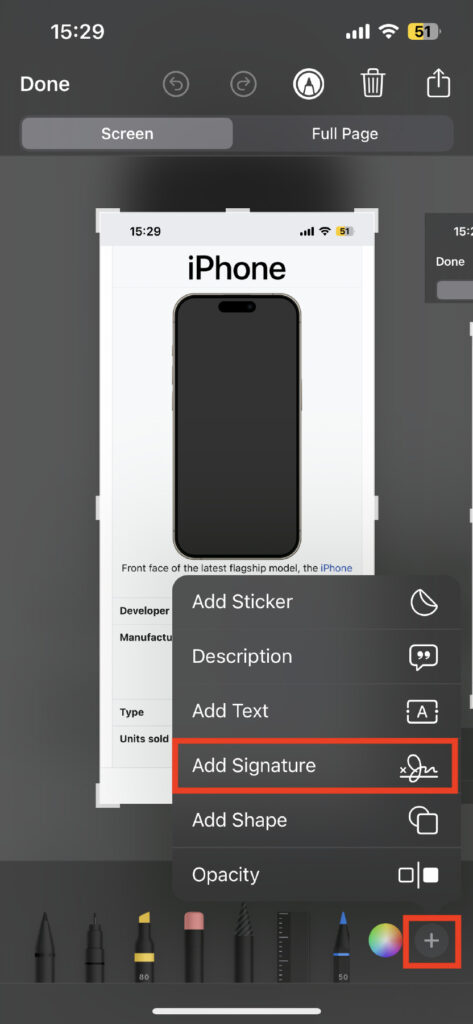
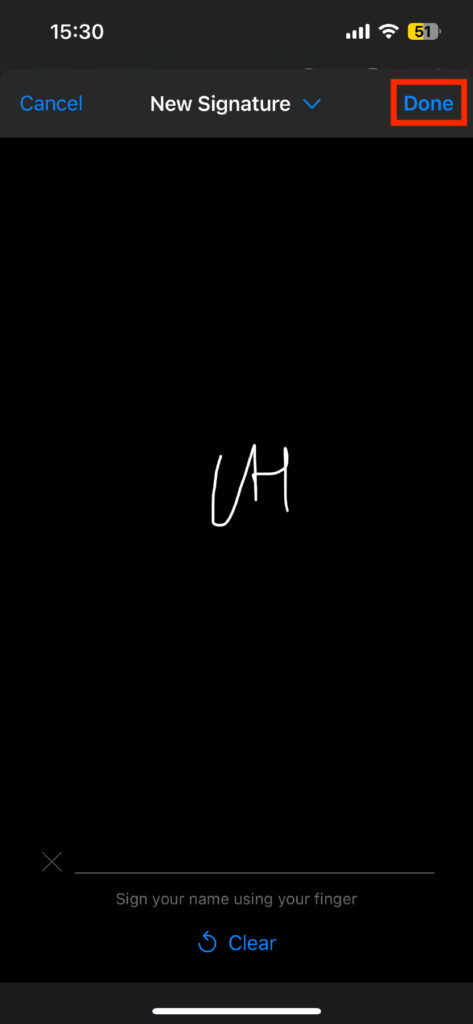
Step 4: Adjust the placement, size, color, and thickness of your signature as needed.
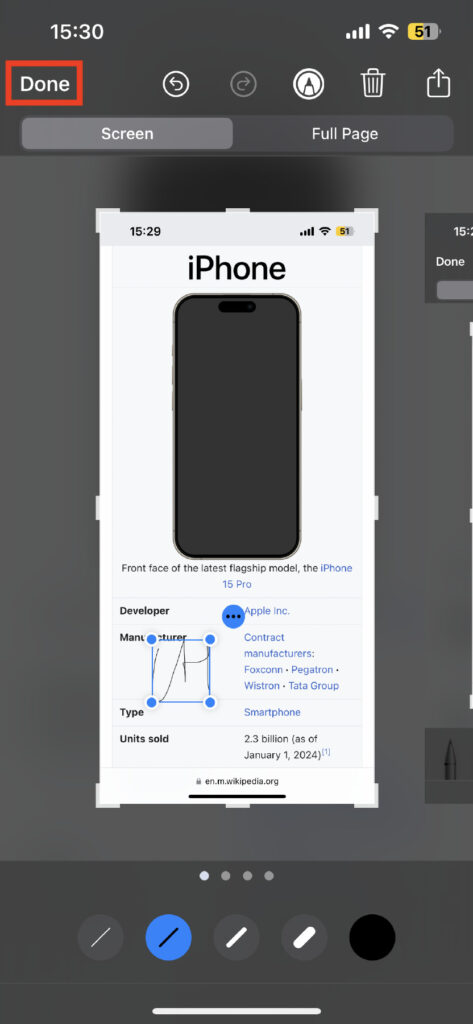
Step 5: Tap Done, then choose to save it to Photos, File, or Quick Note.
Keyboard Hacks
12. Type With One Hand
Sometimes you’ve only got one hand free, but you’ve still got texts to send. Here’s how to make your iPhone’s keyboard more thumb-friendly:
Step 1: Touch and hold the emoji or globe icon on your keyboard. This icon might be on the left or right side, depending on your last used keyboard.
Step 2: A menu will pop up. Here, you can choose:
- Left-Handed Keyboard: Moves the keys closer to your left thumb.
- Right-Handed Keyboard: Moves the keys closer to your right thumb.
To go back to the normal keyboard layout, tap the right or left edge of the keyboard, depending on which one-handed mode you’re using.
13. Turn on Dictation
Let’s break down how to turn on and use the Dictation feature on your iPhone so you can speak your texts or notes instead of typing them!
Enable Dictation
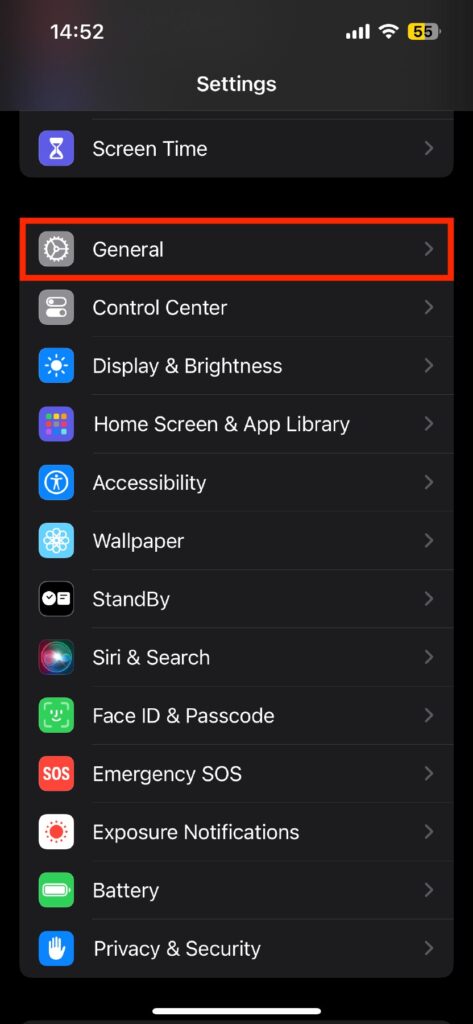
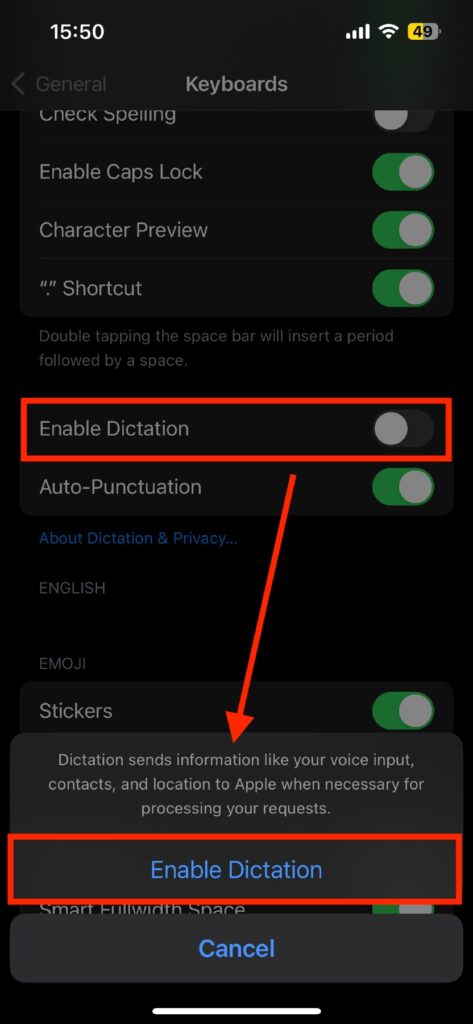
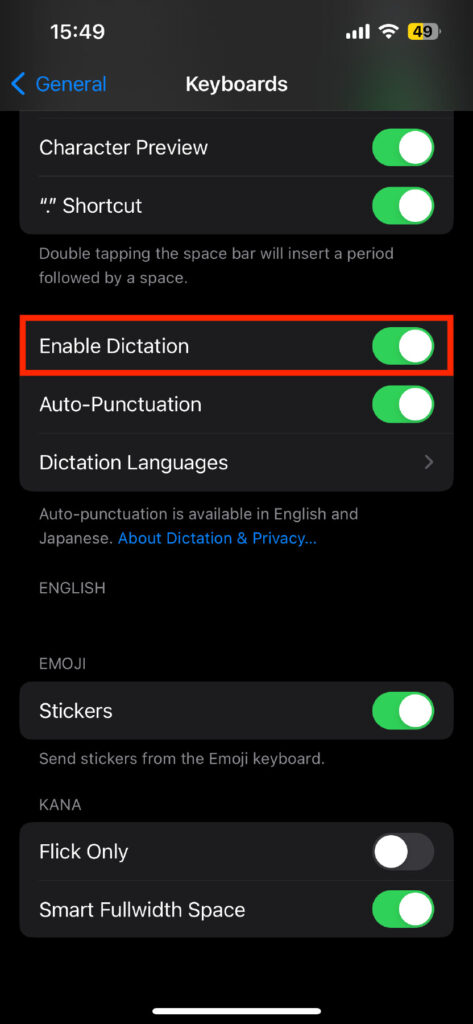
Step 1: Go to Settings, scroll down and tap General, then tap Keyboard.

Step 2: Find and switch on Enable Dictation. If it asks for confirmation, tap Enable Dictation again.
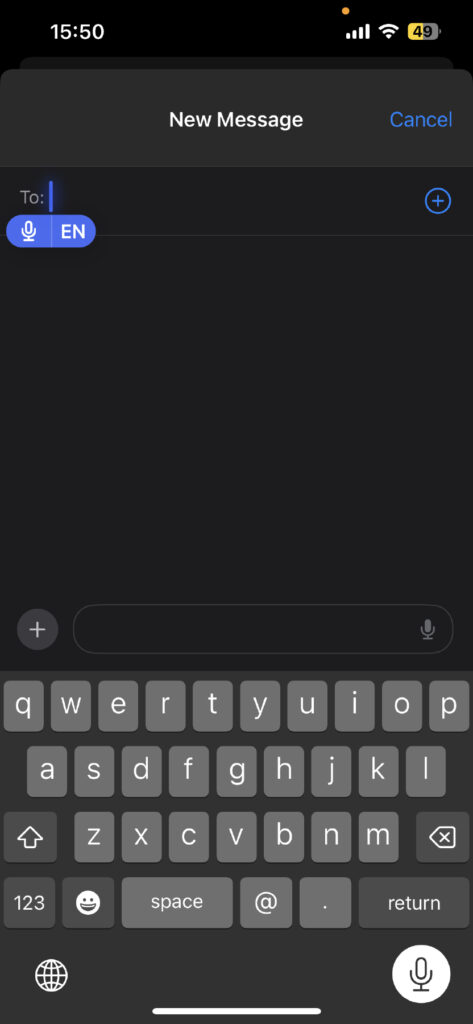
Start Dictating
Step 1: Open any app where you can type, like Messages or Notes. Tap in the text field to place the insertion point where you want to begin dictating text and bring up the keyboard.
Step 2: Look for the Dictate button, which is a microphone icon on the keyboard (it’s usually beside the space bar) and tap it.
Step 3: Once you tap the Dictate button, start speaking.
Here’s how to add more than just words:
- For emojis, say what you want, like “heart emoji.”
- For punctuation, clearly say the mark, like “question mark.”
- To format, use commands like “new paragraph” or “new line.”
Step 6: Tap the Dictate button again to stop dictating. If you pause for a long time (about 30 seconds), it’ll stop automatically.
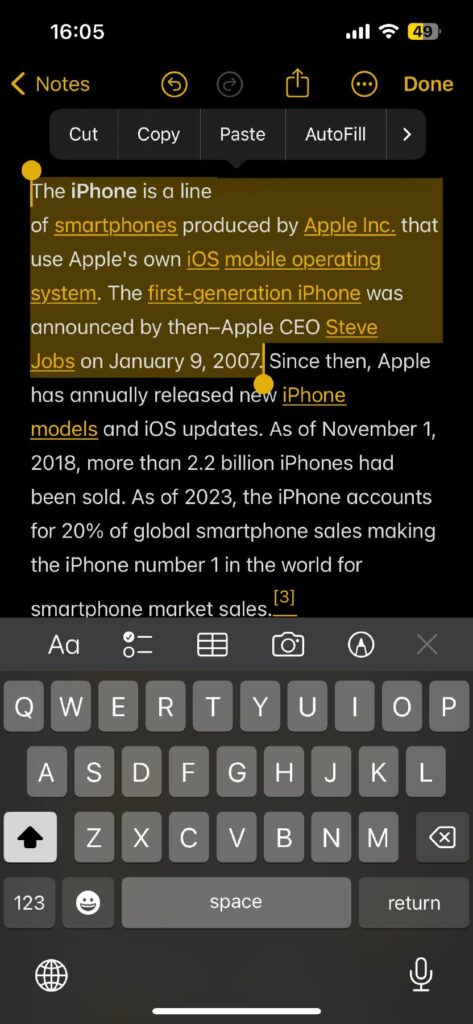
14. Move Text
Step 1: Open any app where you can edit text, like Notes or Mail.
Step 2: Press and hold on a word to select it, then use the handles to adjust your selection to include all the text you want to move.
Step 3: Press and hold on the highlighted area. Your text will sort of “pop out,” indicating it’s ready to be moved.
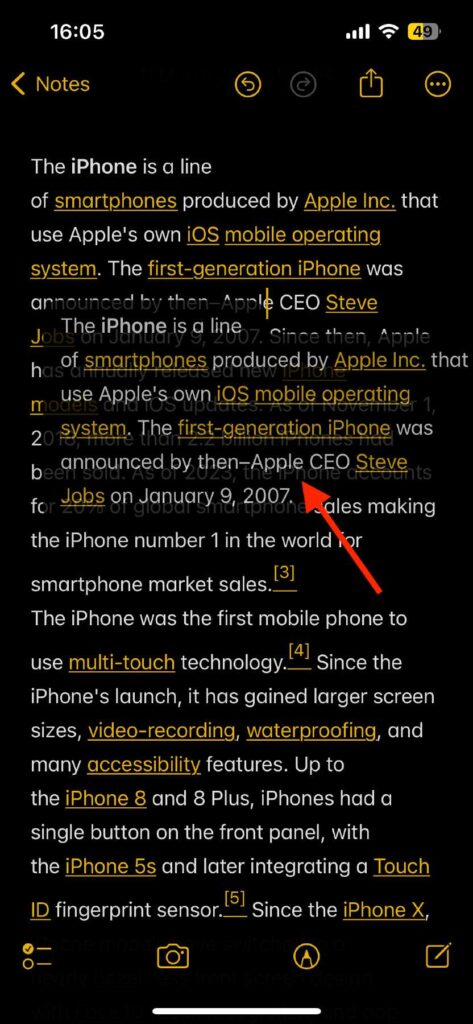
Step 4: Still holding the text, drag it to where you want it to go in the document. You’ll see a cursor moving with you, showing you where the text will land.
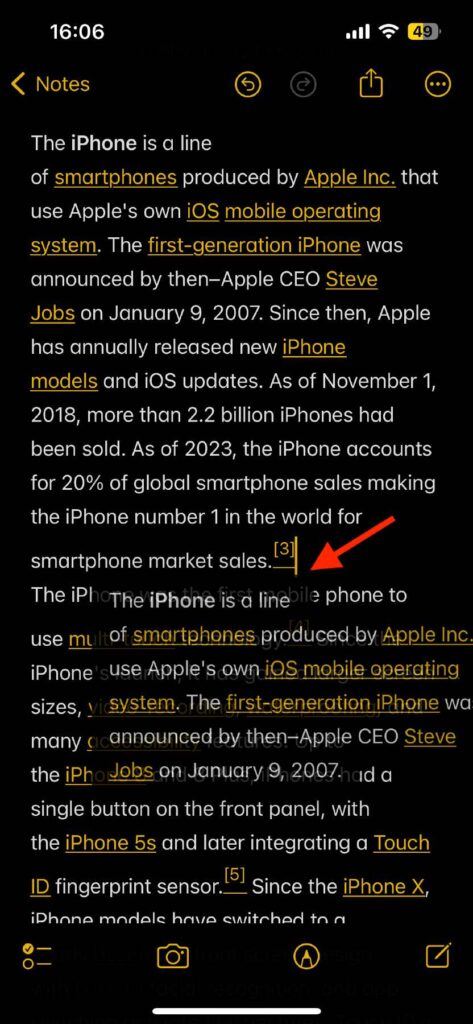
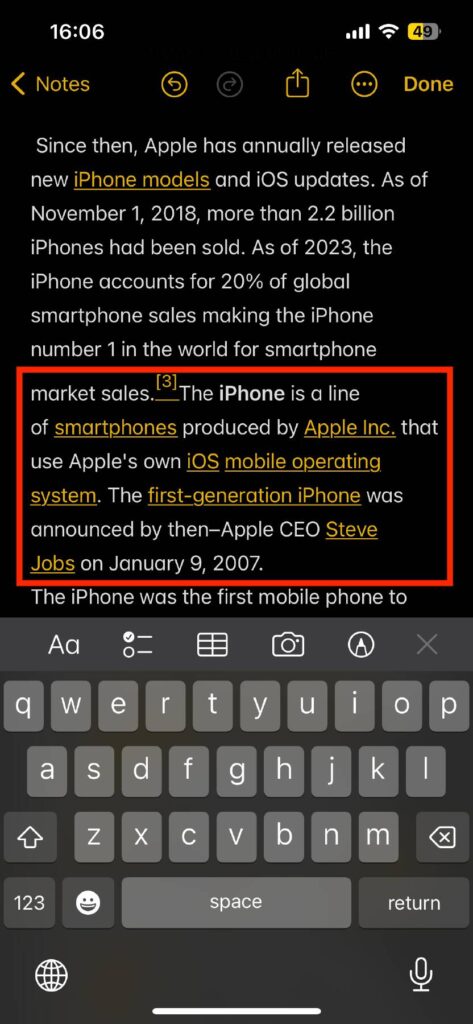
If you decide not to move the text after all, simply lift your finger without dragging or move the text off the screen edge.
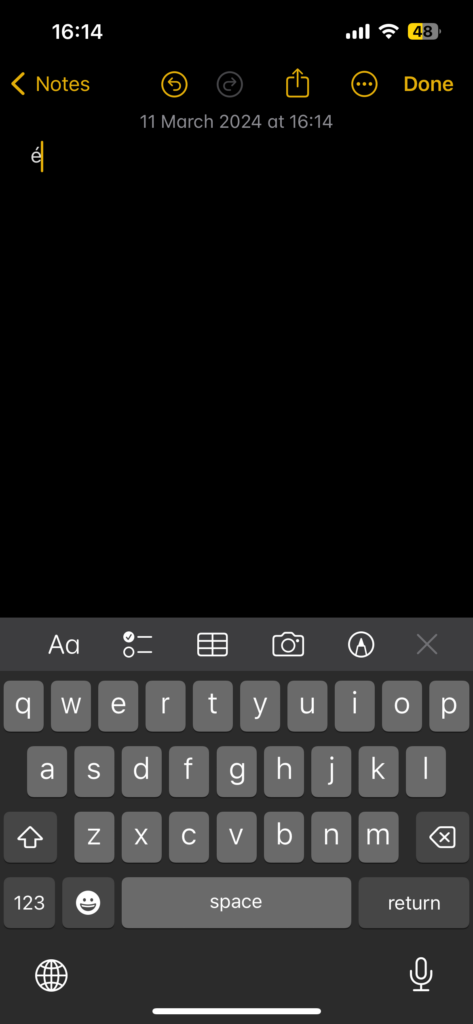
15. Enter Accented Letters
Step 1: Touch and hold any letter on your keyboard where you want an accent or a special variation.
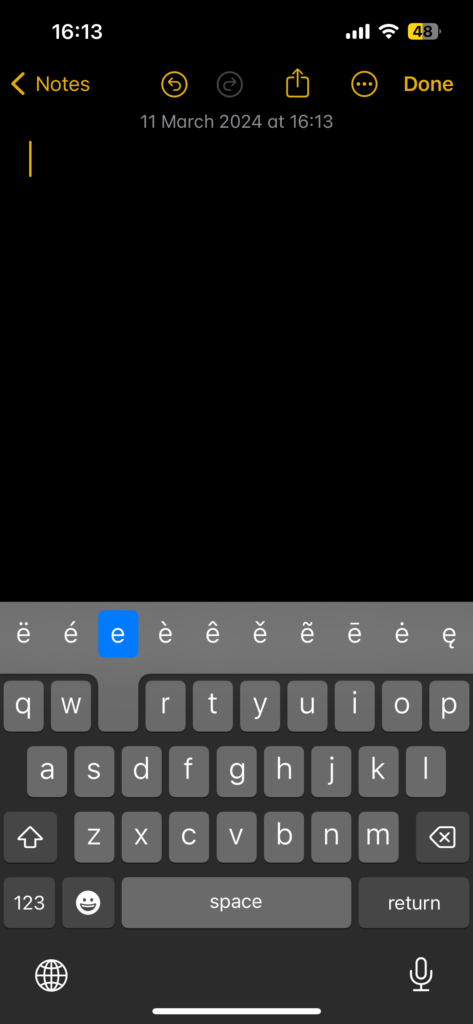
For example, if you want to type “é,” start by pressing and holding the “e.”
Step 2: Without lifting your finger, slide it over the accent or letter variation you want to use. You’ll see a mini menu pop up with different accented options for that letter.

Step 3: Let go over the accented letter of your choice and it will appear in your text.